I am a long time user of the great
EditPad Pro from JGsoft. I use it for text file manipulation and basic programming. I starting using it when it was at version 3 or 4; purchased it at version 5, and even upgraded my licence to 6 and 7!
You may find Text Editors boring - understandable! They are one of those types of software that is not particularly exciting, but for certain people, they are an essential tool. And if they perform slowly or lack intricate features, they will be quickly superseded by something better.
Developers need a powerful text editor. End of story.
As a developer you have to deal with a multitude of file types - config files, data import/export files, source code, database queries, and so on. Often you need to quickly search files, or change their contents and produce a new file.
EditPad Pro is an awesome tool for getting in there and quickly doing what you need. As I mentioned, I've used it for many years
It's an indispensable tool for me. This is due to features such as:
- Customisable syntax highlighting for a very wide range of file types, e.g. sql, vbs, sh, XML
- Powerful regular expression search and replace (actually I also bought RegexBuddy from JGsoft to make constructing these easier)
- Stable handling of very large text files
- Fast operation - fast to load, never laggy
- External tool support - which is the point of this post!
Integrating TFS checkout into EditPad Pro
In my current job, we use Team Foundation Server for source control. Visual Studio 2010 has great integration, in that it automatically checks out files when you try to edit them.
However, we also store various other file types in TFS, which we do not edit in Visual Studio. Personally, I use EditPad Pro (EPP) to edit these. I have been manually checking out the files when I need to edit them using the Shell Integration provided by the
TFS Power Tools. This works fine, but becomes tedious.
Then I remembered that I could integrate the TFS command line application into EPP!
The screenshots below will show you how to do it, but in brief:
- Open a file from your TFS working copy, that is currently checked in (Read Only)
- Click on the Tools menu, then Configure Tools...
- Configure the command line and add a keyboard shortcut. If you want it in the toolbar, you can check 'Show caption on toolbar'
- Close the Tools dialogue and press your keyboard shortcut.
- Your file is now checked out!
Now a bit more detail...
Tool Definition
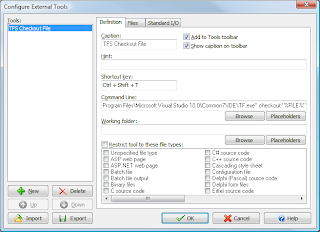
This is where you set up the command line to run, and add the placeholders which pass the information from EPP to the command line tool.
In this case it is very simple:
"C:\Program Files\Microsoft Visual Studio 10.0\Common7\IDE\TF.exe" checkout "%FILE%"
Your path to TF.exe may differ - just search your C drive.
The important part to note is you need the "" around the %FILE% placeholder to ensure that if you have spaces in the path to the file, this will be handled correctly.
TF.exe does not require the working folder to be set.
 |
| Tool Definition - set up the command line here |
Files dialog
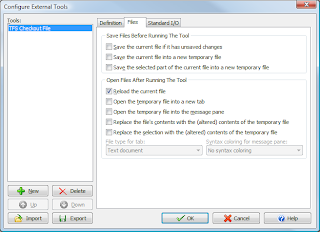
You don't really need to set anything up here, but if you like, you can check 'Reload the current file'. This ensures the latest version checked out from TFS will be displayed. EPP should automatically reload the file anyway though, so it's not strictly required. (You can set this behaviour in the main Preferences dialogue, under Open Files: check 'Automatically reload the active file if it was modified on disk.')
This section may be more useful to you if you want to do something like save your local copy in another temp file before you check out. You could tick the second option to do this.
If you are setting up a TFS check-in task, then you would check the first option to make sure the file is saved before checking in.
 |
| Tool file actions - optional |
Standard I/O Dialogue
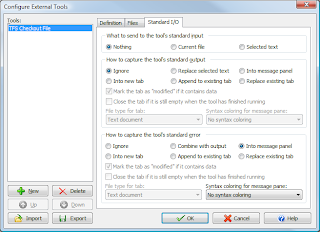
This is useful in case we get any errors. In this case, I set up the standard error to redirect to the message panel. This means you will see any errors if they occur (e.g. TFS down)
You can also set this to save the standard output to the message panel or to a new file. We don't need it in this case, because the standard output just tells us the file was checked out!
These settings are most used for tools which take your file's contents, change them, and produce modified output. With these tools, it's ideal to set the standard output to capture to a new tab. I have done this when using perl scripts to format files, etc.
 |
| Standard I/O - where to send the command line output |
So there you go - look how easy it is to integrate an external tool into your text editor - and save yourself a lot of tedious clicks AND time!
If you are interested in trying out EditPad Pro - it's your lucky day! You can get a 30 day trial of EPP right here. Once the trial ends, it just switches to the Lite version, so you can keep using it forever.


