Converting a DataReader to IEnumerable Using Iterators and Yield in VB.NET

The yield keyword is incredibly useful when you need to convert collections into other types of collections. Unfortunately VB programmers were left out until late last year. Since the Async CTP 3 the yield keyword and Iterator functions have been available for Visual Basic .NET.

You can find lots of examples of this around for C# but some of us corporate contract programmers sometimes have to use VB.NET! 

Here's an example of how to create a list of objects from a DataReader using Yield. To run this you will need to download the Visual Studio Async CTP 3 or .NET 4.5 RC.

So our goal is to take a set of rows from a database, which we access via a DataReader. We want to convert each row into an object, and return all those objects as an IEnumerable - in this case a List(Of T).

Here's our class to store the data as objects. Notice it has a static method to create an instance of itself using a row from a DataReader.


Class StudentRecord
        Public StudentId
        Public UnitCode
        Public HoursPerWeek
        Public NumberOfWeeks
        Public TotalHours
 
        Public Shared Function Create(dr As IDataRecordAs StudentRecord
            Return New StudentRecord With {
                .StudentId = GetStringFromReader(dr, "studentId"),
                .UnitCode = GetStringFromReader(dr, "unitCode"),
                .HourPerWeek = GetDoubleFromReader(dr, "hoursPerWeek"),
                .NumberOfWeeks = GetIntFromReader(dr, "numWeeks"),
                .TotalHours = .HoursPerWeek * .NumberOfWeeks
                }
        End Function
End Class


(GetStringFromReader and similar are helper function from my common utility library. They just return the specified column's value as the required type.)

Next, we have our main loop where we retrieve the data from the database, and then pass it to the conversion method. Let's call it GetData. It queries the DB and returns the list of StudentRecord objects. The details of GetReader aren't important - it just creates a DataReader based on the SqlDatabase and SqlCommand objects.

Note: this code is just for example - we wouldn't normally necessarily have the SQL statement right here!

The interesting part is the call to GetEnumerator. We pass in the type (aka generic type T) we want to get back, as well as the data reader and a function parameter for the static method we saw above. Lastly we convert the IEnumerable it returns to a list.


Private Function GetData() As List(Of StudentRecord)
        Dim db As New SqlDatabase(CONN_STRING)
 
        Using cmd As SqlCommand =
            SqlDatabaseHelper.CreateSqlStringCommand(db,
                                   "SELECT * from students")
            ' Create data reader             Using dr As DbDataReader = GetReader(db, cmd)                 Return GetEnumerator(Of StudentRecord)(dr, AddressOf StudentRecord.Create).ToList()             End Using         End Using     End Function


Last but not least - here's where we convert each row from the DataReader into a StudentRecord. It's quite simple and this is the great bit about how Yield works. We simply pass each row from the reader into the function specifed in the generator function parameter, and it outputs a constructed StudentRecord object. The Yield functionality takes care of executing the StudentRecord.Create method, collecting up all the created objects and returning them as an IEnumerable object.

We can get rid of the reader here because once we've completely iterated we have all the data we need in the IEnumerable.


Public Iterator Function GetEnumerator (Of T)(reader As IDataReader, generator As Func(Of IDataRecordT)) As IEnumerable(Of T)
        Try
            While (reader.Read())
                Yield generator(reader)
            End While
        Catch ex As Exception
            Debug.WriteLine(ex.Message)
        Finally
            reader.Dispose()
        End Try
End Function

So there you have it - a functional Yield scenario written in VB.NET. Personally I love these patterns as they allow you to write much cleaner and testable code Hope it helps!

Unlocking your Vodafone phone to use with another carrier

This post is mostly relevant to Australians, but the instructions might also work in the UK, or other countries.

I recently had enough of Vodafone Australia's terrible call quality and slow data network. I am often out of the city centre, and the quality of service is such that it my phone was often unusable. I couldn't even make a call from my home office!

I moved over to Telstra, and found that my phone was locked to Vodafone, even though I remember the sales guy saying it wasn't :) If you Google something like 'unlock HTC trophy' you'll find a bunch of sites offering to give you the unlock code for $35 or more. Luckily Vodafone Australia provides this for free for some handsets. So even though we can't use Vodafone to make a decent phone call, kudos for providing the unlock codes. I know some carriers charge for this.

So the unlock issue is easy to fix, and I thought I'd put the instructions up so others can benefit.
By the way, this phone is an HTC Trophy, but this should work on anything Vodafone sell.
  1. On your phone's dialer, type *#06#
  2. Write down the number displayed - you will need the first 15 digits. This is your IMEI number.
  3. Get a Telstra SIM card and activate it while porting your number
  4. Turn off your phone
  5. Remove your Vodafone SIM and insert the new SIM.
  6. Turn on your phone
  7. You will be greeted with a message like: "The SIM card can only be used on specific networks. Contact your customer service centre for the unlock code"
  8. Go to https://unlock.vodafone.com.au/voila/handsetunlock/self-service.html?method=selectService and enter the IMEI number and the Captcha
  9. An Unlock code will be generated and displayed at the top of the following page
  10. Enter this number into the phone and press Enter.
  11. Your phone should be ready to use!
  12. In some cases the new SIM may also be locked. If this is the case you need the PIN and PUK code from your new carrier's Customer Service dept.

Windows 7 Backup fails with I/O Error: 0x8078002A

Long story short, the reason this error occurs in general is because the partition is formatted with a sector size of 4kB. This is not supported in Windows 7, but is in Windows 8.
It is frequently experienced with external drives because people often reformat them before using them. Why? They ship with a whole lot of substandard bundled software which can take GB's of space.

When you reformat the drive with the Windows format and default settings, it will create a partition with a sector size of 4kB. The error with Windows Backup occurs because the System Image backup only supports a sector size of 512 bytes.

So the solution is to delete the partition and reformat with a sector size of 512 bytes.

First of all, you can check your drive's current settings with this command:

fsutil fsinfo ntfsinfo DRIVE_LETTER:


You will see something like this:

Bytes Per Sector  :               4096             <<< this needs to be 512
Bytes Per Physical Sector :       <Not Supported>
Bytes Per Cluster :               4096
Bytes Per FileRecord Segment    : 1024


For Western Digital drives you can use their WD Quick Formatter utility.

For others, you may look for a similar utility on the manufacturers website, or a third party utility. I haven't tried any myself, but I did find PC Disk which may help.

References:

Microsoft ASP.NET 4.0 Chart Resources

I'm working on a project using the ASP.NET 4.0 Chart controls (System.Web.UI.DataVisualization.Charting) at the moment and I thought I'd collect the useful resources here. Like many parts of the .NET Framework, the documentation is not so great, but the information is out there if you know where to look.

  • MSDN - the official documentation resource. You will find this useful at times but it is rather terse.
    • Custom Properties List - many chart types have additional properties which are not directly exposed in the designer. You need to set these in the code-behind, or via the CustomProperties parameter which is available on most Chart elements.
  • ASP.NET 4.0 Chart samples - this is probably the best place to start to learn how to accomplish your specific goals.
  • Numeric formatting - for chart label formatting
  • ASP.Net Chart Forum - some decent examples here
  • Alex Gorev's Blog - 3+ years old but does contain a lot of useful information which is still relevant.
  • StackOverflow - ask a question here if you get stuck!

Adding the HTML 5 Facebook Like Button to Blogger

Facebook Like buttons are a cool feature to add to your blog. They really do work to drive more engaged traffic to your precious posts.

The reason is they are not just a static AddThis/ShareThis type of button. Those things never really worked very well. Facebook's buttons, by contrast, add social proof (or lack thereof) to your posts. They do this by:
  • showing how many people already like the page
  • showing photos of these people
They also provide a very easy way for people to quickly share content with their friends. Since 50% of Facebook's 800 million users log in every day, the chances of someone browsing your blog being already logged in to Facebook is pretty high. If they are logged in, when they see the Like button, they literally need to press it and your blog's title, URL, description, and image is instantly posted to their wall. Within seconds others will see it, and may comment, or click through to your site.

So the bottom line is: leverage the astoundingly lively Facebook ecosystem to get more clicks to your site. More importantly, these clicks are coming with a pre-recommendation from their Facebook friend.

Rules of thumb for Facebook buttons:

  1. Make sure the Like/Share/Send is referencing the actual post URL, not the blog's home URL.
  2. Include them at the end of the post - just after the content - so when people have finished reading, it's the next logical step.
  3. Make them prominent and try to nicely integrate them into your page layout.
  4. Customise:
    1. Choose the word Like/Recommend depending on the context. Like is suitable for most sites, but Recommend might be better for product reviews, music, movies, etc..
    2. Use the light/dark colour theme to best match your site's look.
  5. Use Open Graph tags to maximise the impact of your integration - more about that later.

How to Integrate the HTML 5 Facebook Like Button Into Blogger

In a blogging platform like Wordpress, just use a plugin to insert the Like Button - it's the easiest way. But on Blogger, it's not so simple. Having said that, if you want total control, you can use the instructions below to include the Like Button right in your Wordpress Theme's post.php, category.php, or any other relevant file.

I suggest using the HTML 5 code because it's the most simple to integrate. Most browsers should be able to handle it, and this is increasing each day. In addition, the mobile world is heavily investing in HTML 5 so it helps ensure the button will work on mobile browsers too.

If you really can't use HTML 5, you can use the XFBML option with one extra step, or the Iframe version. Keep in mind the Iframe will be blocked by some user's configurations, and does not support the Send button.
  1. Go to https://developers.facebook.com/apps
  2. Set up an Application for your site. If you are only interested in the Like Button, you really just need the App ID, so don't worry too much about what you enter here unless you actually want to create a proper App related to your site.
  3. Then go to:  https://developers.facebook.com/docs/reference/plugins/like/
  4. Configure the button
  5. Put anything in the url, e.g. http://test.com - we will change this later
  6. Click Get Code
  7. The code will pop up - make sure you are looking at the HTML 5 tab.
  8. At the top, select the Facebook App you just created.
  9. Select everything in the first box and copy it to the clipboard.
  10. Now go into your Blogger Dashboard
  11. In the blog you want to modify, go to Template, then click Edit HTML (I am using the latest Blogger Dashboard, if you can't find this, let me know in the Comments.), then click Proceed.
  12. Click 'Expand Widget Templates'
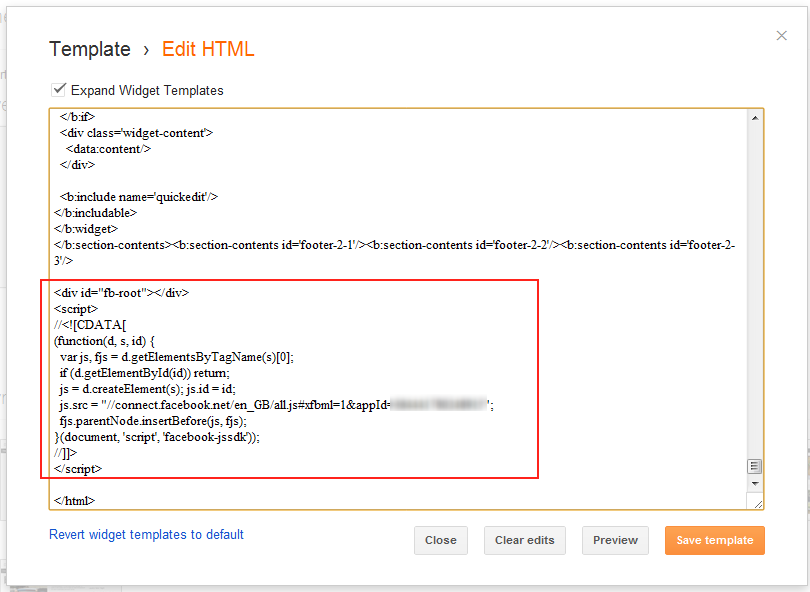
  13. Add the Javascript Facebook SDK code:
    1. Scroll all the way to the bottom of the HTML window, and paste the Facebook code just above the </html> tag.
    2. Then make a blank line after the <script> tag and before the </script> tag.
    3. After the <script> tag, add:  //<![CDATA[
    4. Before the <script> tag, add:   //]]>
    5. This makes sure the javascript remains intact.
    6. By the way, Blogger will move this code higher up in the template when you save it. I found that it's easy to add it here, then let Blogger do its thing.
  14. Add the Facebook Like button code:
    1. Go back to the Facebook Like Button Developer page and copy the code from the second box.
    2. Search for "<div class='post-footer'>"
    3. Just after this line, paste the Facebook code.
    4. Now we need to edit the URL.
    5. In the code you just pasted, change the data-href attribute to: expr:data-href="data:post.url". The entire line of code should look something like this: <div class="fb-like" expr:data-href="data:post.url" data-send="true" data-width="450" data-show-faces="true"></div>
    6. Copy the line you just edited.
    7. Search again for "<div class='post-footer'>" to find the mobile section of the template, and paste the line in again, after the line with "<div class='post-footer'>".
  15. Click Preview and check how it all looks.
  16. When you are happy with it, click Save Template.
  17. That's it! You may like to change the built in Blogger widgets to remove the Facebook button, as now it's redundant.
Here are some screenshots to help you:
Facebook SDK code at bottom of template

The code for adding the button to the post
That's all you need to do to integrate the button, but we can do a bit more by adding the Open Graph information to the template's meta tags.

Adding Open Graph Information to your Blogger Blog

I don't know much about Open Graph, but I assume it will become more and more used by Facebook. They releases a new version last year, so this shows that they are committed to it.

In relation to the Like Button, it allows you to better control what actually gets posted to the user's wall.

You basically need to add six meta tags. You can generate these on this page and then modify them slightly for blogger. Again these instructions can be pretty easily adapted for use with Wordpress Themes.

Read about how Open Graph works.

On the Facebook page:
  1. Leave Title blank - we will modify this later
  2. Under Type, select Article, or something else if it makes more sense.
  3. URL: leave blank
  4. Image: leave blank unless you have a URL to a logo you want included. If so, paste in the full URL to the image. In Blogger, I don't know of a way to dynamically insert image URLs from a given post, but this is pretty easy in Wordpress.

    I have noticed that if you leave this tag out of your template, Facebook will automatically grab the first image from the post when someone posts it to their wall. So you can just leave it out unless you want to post a specific image.
  5. Site name: leave blank
  6. Admin: leave with the ID already included.
  7. Click Get Tags and copy the output.

Now to your Blogger template:
  1. Again go to Edit Template in Blogger.
  2. Expand Widget Templates
  3. At the top of the HTML box, find the line with the text:  <meta expr:content='data:blog.metaDescription' name='description'/>
  4. Paste the tags you copied under this line.
  5. Now we need to edit them like so:
<meta property="og:title" expr:content="data:blog.pageTitle" />
<meta property="og:type" content="article" />
<meta property="og:url" expr:content="data:blog.url" />
<meta property="og:image" expr:content="http://test.com/image.png" />
<meta property="og:site_name" expr:content="data:blog.title" />
<meta property="fb:admins" content="your user id, e.g. 123456789" />


It's also recommended to add the following tag:

<meta property="og:description" expr:content="data:blog.metaDescription" />

If the tag content is blank, you should not leave them in your template, as it will cause an error.

Now save your template and test your Like Buttons!!

Any questions - please fire away in the comments.

Tags

windows (10) microsoft (9) .net (6) google chrome (5) windows 7 (5) asp.net (4) google (4) google browser (4) development (3) javascript (3) mssql (3) rss (3) sql server (3) wordpress (3) automation (2) blogging (2) css (2) database (2) firefox (2) get all wordpress images (2) gmail (2) google docs (2) intel (2) internet explorer (2) linux (2) linux commands (2) microsoft word (2) mysql (2) netsh (2) network issue (2) proxy (2) seo tips (2) shell (2) sun (2) tfs (2) videos (2) wget (2) windows networking (2) windows vista (2) winhttp (2) .net 3.5 (1) .net 4.5 (1) .net async ctp3 (1) .net framework 4.0 (1) 404 (1) JungleDisk (1) access (1) active directory (1) addons (1) adobe acrobat (1) adobe dlm (1) adobe reader (1) adp (1) adsense (1) adtoll (1) adwords (1) amazon (1) antivirus (1) asp.net 4.0 (1) authentication (1) back links (1) backlinks (1) bacula (1) bash (1) batch files (1) blogger (1) box (1) browser exploits (1) category rss (1) cell phone (1) cell phone comparison (1) charting (1) cheap cell phones (1) cheap laptop upgrades (1) checkout (1) chrome (1) chrome.manifest (1) cloud (1) cloud hosting (1) cloud vps (1) code (1) color chart (1) colour chart (1) conditional formatting (1) config (1) configuration (1) context menu (1) copy (1) corrupt (1) credentials (1) cross-reference (1) database scripts (1) dba scripts (1) debian (1) decrypt (1) delete file windows vista (1) delete files (1) dell (1) dell laptop (1) dell studio (1) dell studio 1537 (1) dhcp (1) directory size (1) div (1) dns (1) document properties (1) dotnet (1) download (1) dreamhost (1) dreamhost coupon (1) dreamhost promo (1) dreamhost promo code (1) drive letter (1) drivers (1) duplicate content (1) editpad pro (1) encrypt (1) encryption (1) error (1) error code (1) excel (1) exception (1) external hard drive (1) facebook (1) faviconize (1) feeds (1) firefox 3 rc1 (1) firefox 3.1 (1) firefox addons (1) firefox tabs (1) firewall (1) firewall script (1) fix (1) fix .net framework (1) foreign keys (1) gmail 2.0 (1) gmail error (1) google chrome 2.0 (1) google chrome dev (1) google chrome exploit (1) google reader (1) google reader tags (1) gtdinbox (1) hard drive (1) hex color (1) hex colour (1) htaccess (1) html (1) html 5 (1) iis6 (1) installation (1) ipod touch (1) ipod touch 2g (1) ipod touch freeze (1) ipod touch magnet case (1) ipod touch magnet case problem (1) ipod touch problem (1) iterator pattern (1) itunes (1) java (1) joomla (1) jquery (1) laptop (1) laptop upgrade (1) laptops (1) latex (1) leeching (1) like button (1) link checker (1) linkbacks (1) linq (1) linqdatasource (1) lost password (1) making money online (1) map drive (1) mega cheap phones (1) microsoft excel (1) microsoft signature (1) microsoft store (1) microsoft web deploy (1) microsoft windows (1) microsoft word 2007 (1) minimize firefox tabs (1) mozy (1) ms word (1) msdeploy (1) msdtc (1) nant (1) netstumbler (1) network path not found (1) network path was not found (1) network problem (1) networking (1) new movies (1) nintendo (1) nirsoft (1) nocheckbrowser (1) number (1) odf (1) odt (1) online backups (1) open source browser (1) openoffice (1) oracle (1) oracle client (1) photoshop (1) phpmyadmin (1) podcast (1) powershell (1) pr checker (1) productivity (1) proxy server (1) proxycfg (1) putty (1) recover (1) registry (1) reinstall windows 7 (1) remote desktop (1) remove (1) repair (1) reset joomla admin password (1) rewrite (1) rsa (1) sandy bridge laptop (1) seagate momentus xt (1) seo tools (1) sequence (1) server monitoring (1) sftp (1) social networks (1) softlayer (1) soulseek (1) spreadsheet (1) spreadsheet formula (1) sql (1) sql scripts (1) sql server management studio (1) sqlclient (1) ssh (1) ssis (1) ssl (1) ssms (1) subst (1) tabmixplus (1) telstra (1) text editor (1) trust (1) unlock cell phone (1) unlock mobile phone (1) upgrade laptop hard drive (1) user management (1) vb.net (1) video download (1) virtual server (1) visual studio (1) vodafone (1) vodafone australia (1) vps (1) vps.net (1) wd external drive (1) web deploy (1) web dev (1) web development (1) web hosting (1) web security (1) webdev (1) webmail (1) webmaster tips (1) western digital (1) wifi networks (1) wii (1) win7 (1) windows 7 backup (1) windows 7 gadgets (1) windows 8 (1) windows 8 antivirus (1) windows error (1) windows live (1) windows live essentials (1) windows live toolbar (1) windows tips (1) windows web development (1) windows xp (1) winxp (1) wireless networks (1) word tips (1) wordpress 2.7 (1) wordpress plugin (1) wp super cache (1) yield (1) youtube download (1) youtube playlist download (1)